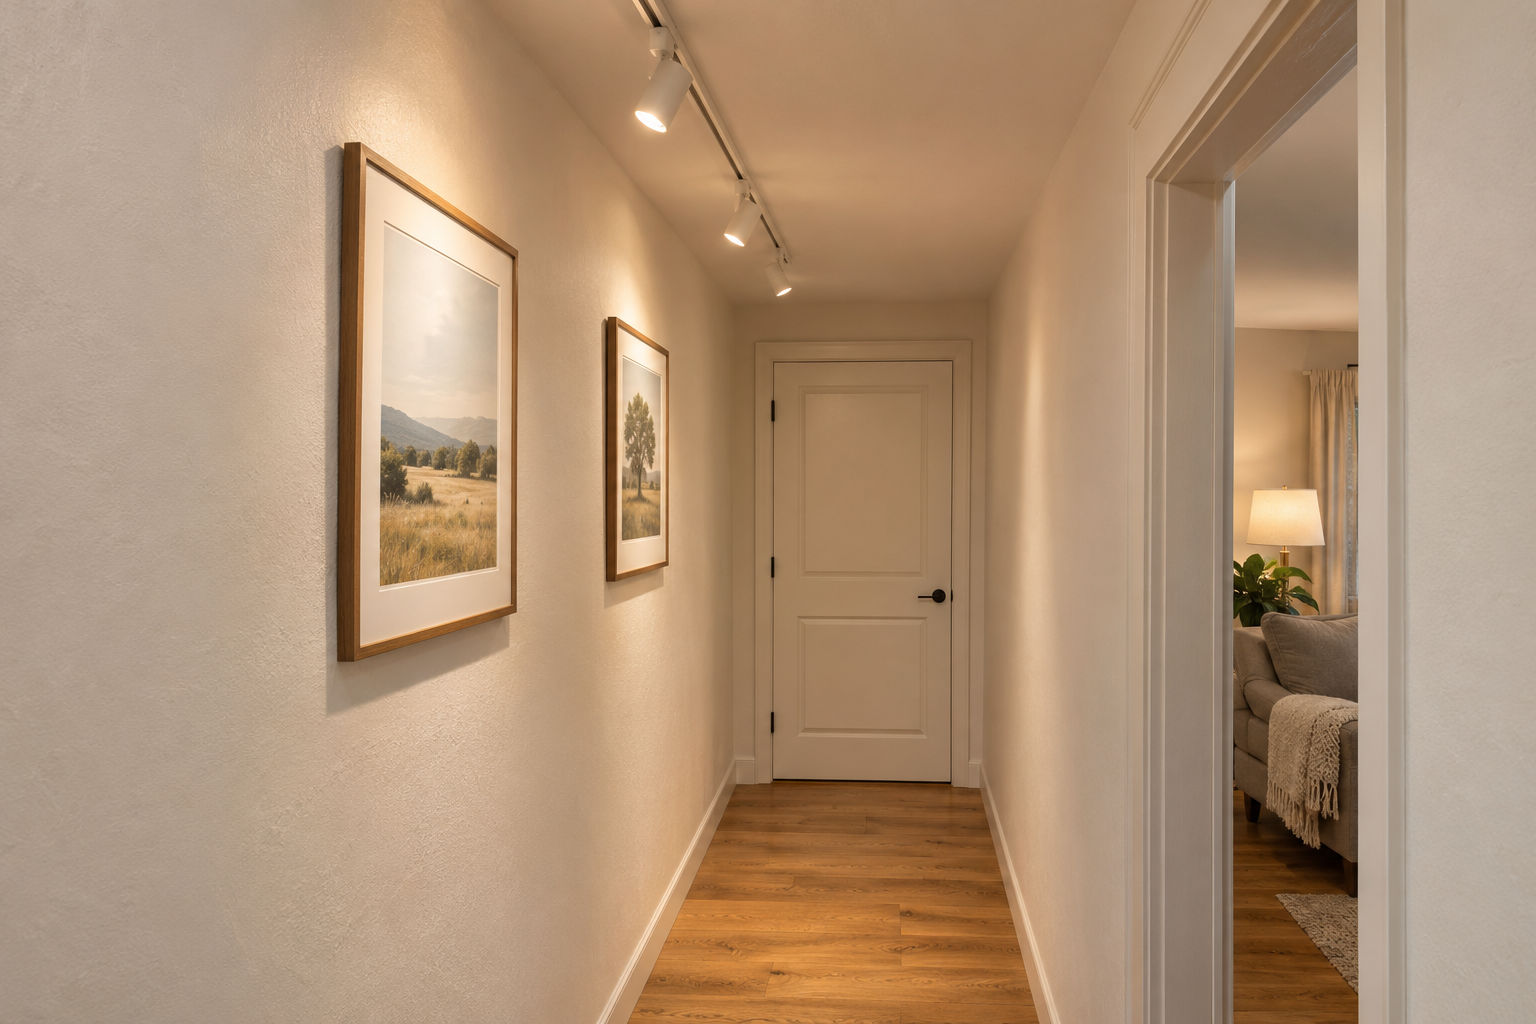
A hallway needs a readable walking route, comfortable light at eye level and a sensible connection to the rooms beside it. Replacing an old ceiling fitting can improve its appearance, but the new fixture still needs to put light where you need it. I would start with those jobs before choosing between track, recessed lights and another surface fitting.
For a narrow hall with pictures on one wall, consider lighting that wall as well as the floor. If the ceiling cannot accommodate recessed fixtures, adjustable track or a suitable surface-mounted light may be worth comparing. Keep the choice open until you know the dimensions, available wiring and views from both ends.
1. Measure the hallway before choosing fixtures
Write down the length, width and ceiling height. Mark door swings, cupboards, changes in level and anything projecting into the route. Measure the existing light positions and note where the switches can be reached. Include the view into the living or dining room: a fixture that looks quiet from inside the hallway can be conspicuous from the sofa.
Confirm what the ceiling can accommodate. A shallow ceiling void, structural members, insulation, pipework or restrictions on alterations can change the options. If recessed lighting has been ruled out, ask which condition prevents it rather than assuming that every recessed product requires the same space. Have an electrician confirm the ceiling and circuit conditions before any cutting or installation.
Record the colour and finish of the walls, floor and picture glazing. Pale walls can return useful light into the space; dark finishes change the result. A glossy picture or polished floor can reflect a bright source into your view. Also set a budget that includes installation, making good the ceiling and compatible controls.
2. Decide whether the problem is the route, the wall or glare
Walk through the hall with the existing lights on. Check the floor near each doorway and the far end. If these areas are difficult to see, address general illumination first. A bright patch beneath one fitting does not tell you whether the rest of the route is adequately lit.
Next, look at the walls and pictures. Illuminated vertical surfaces can make a narrow passage easier to read and help orientation. Lighting artwork can give the space a focus, but a few bright pictures do not guarantee useful light everywhere you walk. Check both jobs separately.
Finally, look toward each light from both ends, from adjoining rooms and from the heights of people who use the home. If the bare source dominates your view, adding more output may increase discomfort. Compare source shielding, direction and dimming before increasing brightness. The glare guide explains why a bright visible source can be uncomfortable even when the floor is not especially bright.
3. Try the wall-lighting idea before committing
Use removable tape to mark proposed fixture positions or the outline of a wall fitting. Check the marks against door swings, picture locations and views from the adjoining rooms. Tape is a planning aid; use the manufacturer’s approved fixings for the actual fixtures.
For artwork, aim for useful coverage without a bright reflection in the glazing or an obvious frame shadow. The right aiming position changes with the frame, picture size and viewing direction. Follow the artwork lighting guide to work through those variables rather than treating one mounting height or aiming angle as a rule for every hall.
Ask for a demonstration or a safely supported sample where practical. Look at the wall, then look back toward the fixture. A wall can appear beautifully lit while the source remains uncomfortable from the opposite direction. Do not judge the result solely from a photograph: exposure can hide glare and exaggerate the difference between bright and dark areas.
4. Compare track, recessed and surface-mounted lights
Choose the type around the job and the available space, then compare specific products.
| Option | When it is worth considering | What to check before choosing |
|---|---|---|
| Low-profile track with adjustable heads | You want to aim light at artwork or change the aiming later | Head projection, views into the sources, exact track/head compatibility and the position of the electrical feed |
| Adjustable recessed downlights | You want a quieter ceiling and have suitable installation conditions | Ceiling depth, obstructions, required ratings, adjustment range and shielding at the chosen angle |
| Flush or semi-flush surface light | You want general light without a row of adjustable heads | Overall drop, distribution, visible diffuser brightness and coverage toward the ends |
A track can connect the hallway visually with track in an adjoining room, but compare its scale and finish from the shared viewpoint. Its suitability depends on the space and your taste. Check the complete system’s instructions: similar-looking heads, adapters and rails are not sufficient evidence of compatibility.
Recessed lights can reduce visible hardware, though the ability to aim and shield the source depends on the actual optics and trim. A surface light can be a practical replacement at an existing point, but verify that the ceiling box, support and wiring suit the new fitting. Reusing a position does not prove that one or two fixtures will provide the right distribution.
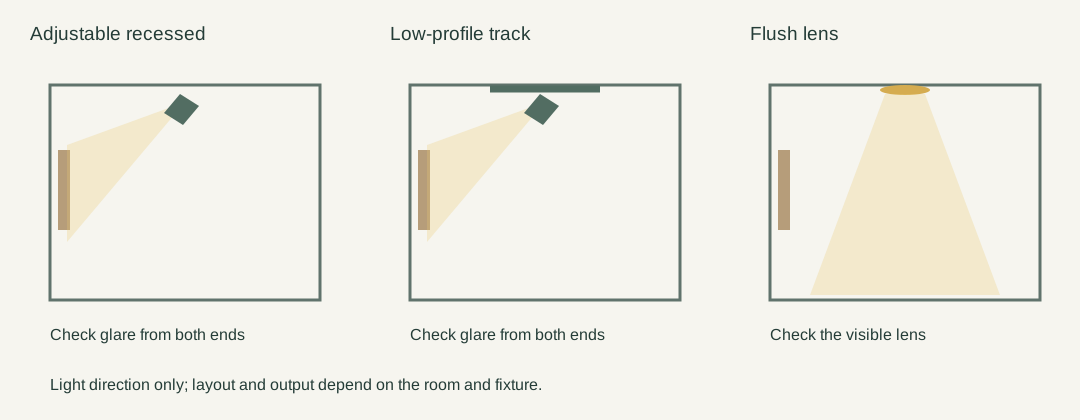
Set the quantity and spacing from the hallway geometry, useful fixture output and beam distribution. Ask for photometric information or a layout assessment where the result is uncertain. Aperture size alone cannot establish a spacing rule. The recessed spacing guide and recessed lighting calculator can help organize the inputs; a preliminary calculation still needs checking against the actual fixture and room.
5. Understand wafer and regressed designs before judging glare
A wafer light usually has a shallow body and a luminous lens close to the ceiling plane. A regressed design sets the light source farther back inside the fixture. Recess depth and shielding can limit direct views of the source, although aiming angle, trim and viewing direction also matter. “Canless” describes an installation approach and does not by itself tell you how well the source is shielded.
Avoid treating every wafer as poor quality or every regressed light as comfortable. Compare the actual visible aperture, distribution, dimming behaviour and output. A small fitting can still be painfully bright to look into, and a deeply set source aimed toward an entrance can still enter your sightline. Use the wafer versus regressed comparison to separate the construction choices before comparing models.
For a low ceiling, inspect the source from normal walking positions. Reducing the dimmer setting may help comfort, but confirm that the floor and doorways remain readable. A product with better light control may be more useful than a brighter version of the same exposed lens.
6. Check sconce projection and hidden-strip access
A wall light may work in a narrow hall if its projection leaves enough clear walking space and does not conflict with doors, shoulders or carried objects. Measure the full fitting, including its shade, and mark its outline at the proposed height. Check both sides if you are considering opposing fixtures. Confirm applicable clearance and accessibility requirements for your location with the installer; there is no single dimension that can be applied to every home.
Compare a shallow wall sconce with a deeper decorative fitting. Inspect glare from each direction and the light pattern above and below it. A beautiful shade is still a physical object in the route.
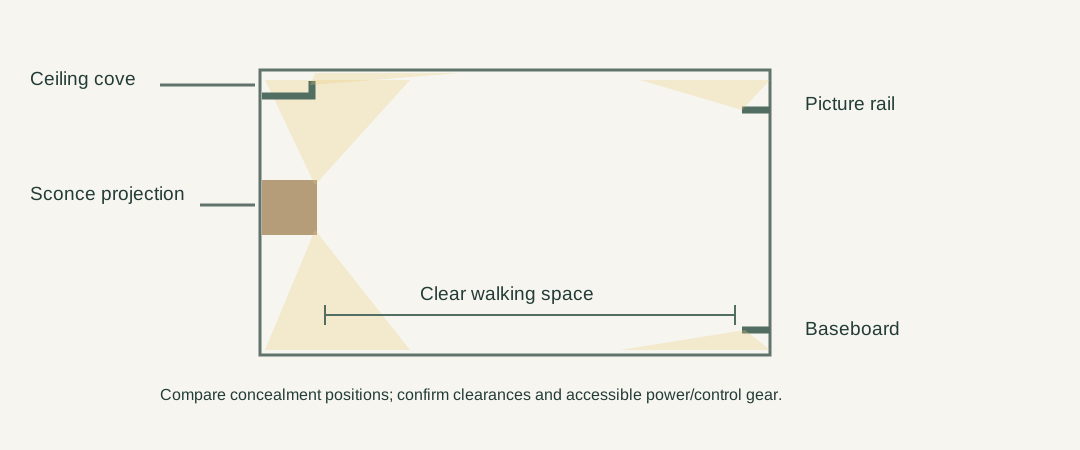
For indirect light, check a ceiling cove, a purpose-made picture rail or a protected baseboard detail. The LEDs need to remain out of ordinary sightlines while the reflected light reaches the intended surface. A low-level strip can support nighttime wayfinding, but assess it separately from the general light needed for cleaning and normal movement. Do not assume it can replace the hallway’s main lighting.
Plan the profile, approved fixing, heat management, wiring route and accessible driver before enclosing anything. Keep cords and channels out of the walking path. Leave a way to replace the strip without damaging the wall. The cove lighting guide covers the relationship between concealment, reflected light and maintenance.
7. Match colour and test the actual dimming combination
Compare a warm-white option around 2700–3000 K with the light in the rooms visible from the hall. That range is a useful preference to try in a home, not a requirement. A cooler appearance may suit your finishes or neighbouring room; 5000 K is not inherently wrong. Judge the transition with both spaces lit and the doors in their normal positions.
Separate colour temperature from colour rendering. Two fixtures can have the same nominal colour temperature and show the colours in a picture differently. Request colour-rendering information, such as CRI, especially when artwork matters. Also compare the installed appearance of samples rather than relying only on a number in a listing.
Check the exact driver, lamp and dimmer combination against the manufacturer’s compatibility information. Ask about the usable dimming range, low-end stability and any minimum load. Try the actual combination at the brightness you expect to use at night, looking for flicker, dropout, abrupt changes or audible noise. Request product-specific flicker information; a “dimmable” label alone does not describe its behaviour with your control. A phone camera can reveal some artefacts but cannot establish the absence of flicker.
8. Confirm the electrical and control plan with an electrician
Use a qualified electrician, licensed where required, for new or relocated mains fixtures, wiring changes and ceiling openings associated with the installation. Local rules, the building construction and product instructions govern the work. This guide cannot establish whether a particular ceiling or circuit is suitable.
For recessed products, have the installer check insulation contact, clearance and any air-barrier requirements. In systems using Type IC marking, that marking addresses insulation contact; an airtight rating addresses air leakage. They are separate characteristics. Follow the exact fixture instructions and locally adopted requirements rather than assuming a shallow fitting is suitable for every insulated ceiling. Check location ratings separately wherever moisture exposure requires them.
Place controls so you can turn on useful light before entering a dark route. Check access from both ends and from any adjoining room that is regularly used at night. Motion sensing can be convenient, but consider coverage, timing and manual operation. Keep access to essential controls practical for the people living there.
If the hallway meets stairs, assess the steps and landings as a separate lighting task. A well-lit corridor does not establish that the stairs are adequately lit. Use the stair lighting guide for that transition.
9. Walk through the finished plan in both directions
Use this order before buying and again before signing off the installation:
- Measure the hallway, ceiling conditions, door swings and existing electrical points.
- Identify the priority: the walking route, wall art, glare or a combination.
- Compare fixture types around those jobs and the available space.
- Check distribution, source visibility, projection, ratings and system compatibility.
- Compare colour with neighbouring rooms and verify the dimmer combination.
- Have the electrician confirm the wiring, supports, ceiling work and control positions.
- Walk both ways at normal and nighttime settings. Check doorways, reflections, source glare and access to switches.
The aim is a hallway that is comfortable to move through and easy to use. Choose the fitting after the route, walls and sightlines make sense together.
Questions & discussion
Share a question or a useful experience about this guide. Comments appear immediately. Your name and comment are public. Email is optional and stays private; reply emails are not enabled yet. Comment privacy.