A successful LED cove hides the strip from normal viewing positions and spreads reflected light across the ceiling or wall without obvious dots or bright patches. Start with the cove’s cross-section and a temporary mock-up. Buying a long roll first can leave you with visible LEDs, inaccessible drivers or uneven brightness.
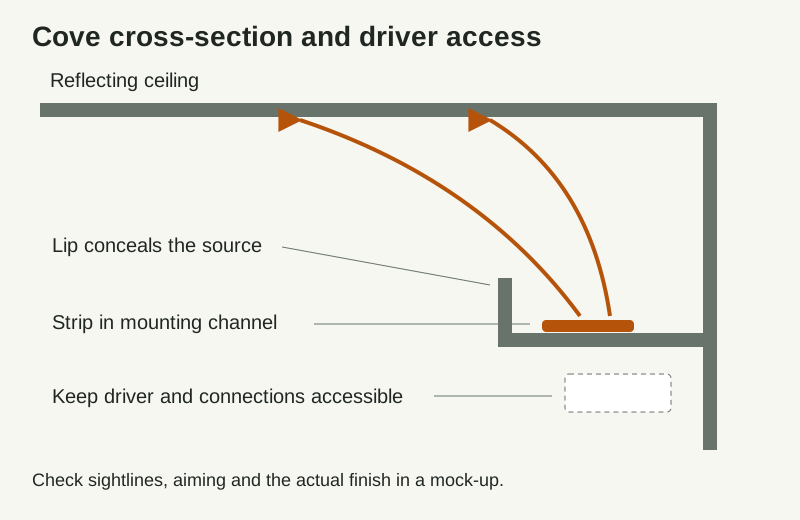
Decide what the cove must do
Ambient fill, a decorative ceiling edge and useful task lighting are different jobs. A cove can support the room’s general lighting, but reflected output depends on the ceiling, geometry and strip. Do not infer desk illuminance from the strip’s advertised lumens per metre. Use the layered-lighting guide to keep indirect, task and accent layers distinct.
Walk the room and identify seated, standing and doorway views. A strip hidden from one chair can be exposed from a staircase. Mark where the source must remain concealed, where light should land and where the finish is glossy enough to reflect the individual LEDs.
Build a cross-section mock-up
| Part of the cove | What to check in a sample section | What a failure looks like |
|---|---|---|
| Concealing lip | Source visibility from ordinary positions | Direct view of bright LEDs |
| Setback and aiming | Spread across the intended surface | Narrow streak or abrupt bright edge |
| Ceiling and wall finish | Uniformity, texture and reflections | Patchiness, visible defects or reflected dots |
| Strip and channel | Mounting and heat path required by the maker | Loose tape, unsupported bends or overheating |
| Driver position | Ventilation, electrical protection and access | A sealed-in component that cannot be replaced |
There is no universal setback dimension that fits every strip, ceiling and room. Use the actual profile, diffuser and intended strip in the sample. The SignliteLED cove overview describes the indirect-lighting arrangement; its product suggestions are not measurements for your room.
Check the mock-up at low and high output. A diffuser can change source visibility and useful output, so it belongs in the trial rather than being added as an afterthought. Rework uneven plaster and paint before judging whether a different strip will solve the pattern.
Choose one compatible electrical system
Confirm strip voltage, power per unit length, permitted run length, cut points, connector rating and the recommended mounting channel. Match the driver and control method to those exact requirements. A constant-voltage strip does not become compatible with an unrelated constant-current driver because both products are called LED equipment.
For an invented arithmetic example, 6 metres of strip rated at 10 watts per metre represents a nominal 60-watt strip load. That multiplication does not select a driver: add the maker’s required allowance, check ambient-temperature derating, start-up behavior, control compatibility and circuit limits. The strip-power calculator can organize the load calculation; the product instructions govern the installation.
Long runs may need separate feeds or shorter sections to control voltage drop. Follow the exact product’s instructions rather than extending an arbitrary reel end-to-end. Keep wiring, connection and protection design with a qualified installer where local rules require one. Do not place mains connections inside a decorative void without suitable enclosures and access.
Decide the color and control scenes
Compare CCT with the other room layers and the ceiling paint. A cool cove beside warm decorative lamps can be intentional, but make that decision with samples rather than a catalogue thumbnail. Read 4000K vs 5000K when choosing between those whites.
If you want dimming, test the driver, controller and strip together at the low end before completing the cove. Look for unstable steps, flicker and unexpected shutoff. Tunable-white and RGB systems require the appropriate channel arrangement and controls; an ordinary single-channel dimmer cannot supply those functions.
Leave a route for maintenance
Make drivers and connectors reachable without destroying the ceiling. Label feeds and record where each run starts. Keep an installation sketch with model numbers and replacement details. Avoid hiding every connection behind permanently finished trim just to obtain a clean photograph.
After fitting, inspect from the same positions used for the mock-up. Confirm secure mounting, even appearance, functioning controls and accessible service points. The LED-strip installation guide covers the general installation sequence; this page focuses on the cove geometry and reflected-light decision.
If the result has dark sections, glare or visible dots, troubleshoot the relevant cause separately. More wattage is not a universal remedy for a poor sightline or a reflective ceiling.
Next steps
LED-strip installation · LED-strip power calculator · Layered lighting
Questions & discussion
Share a question or a useful experience about this guide. Comments appear immediately. Your name and comment are public. Email is optional and stays private; reply emails are not enabled yet. Comment privacy.