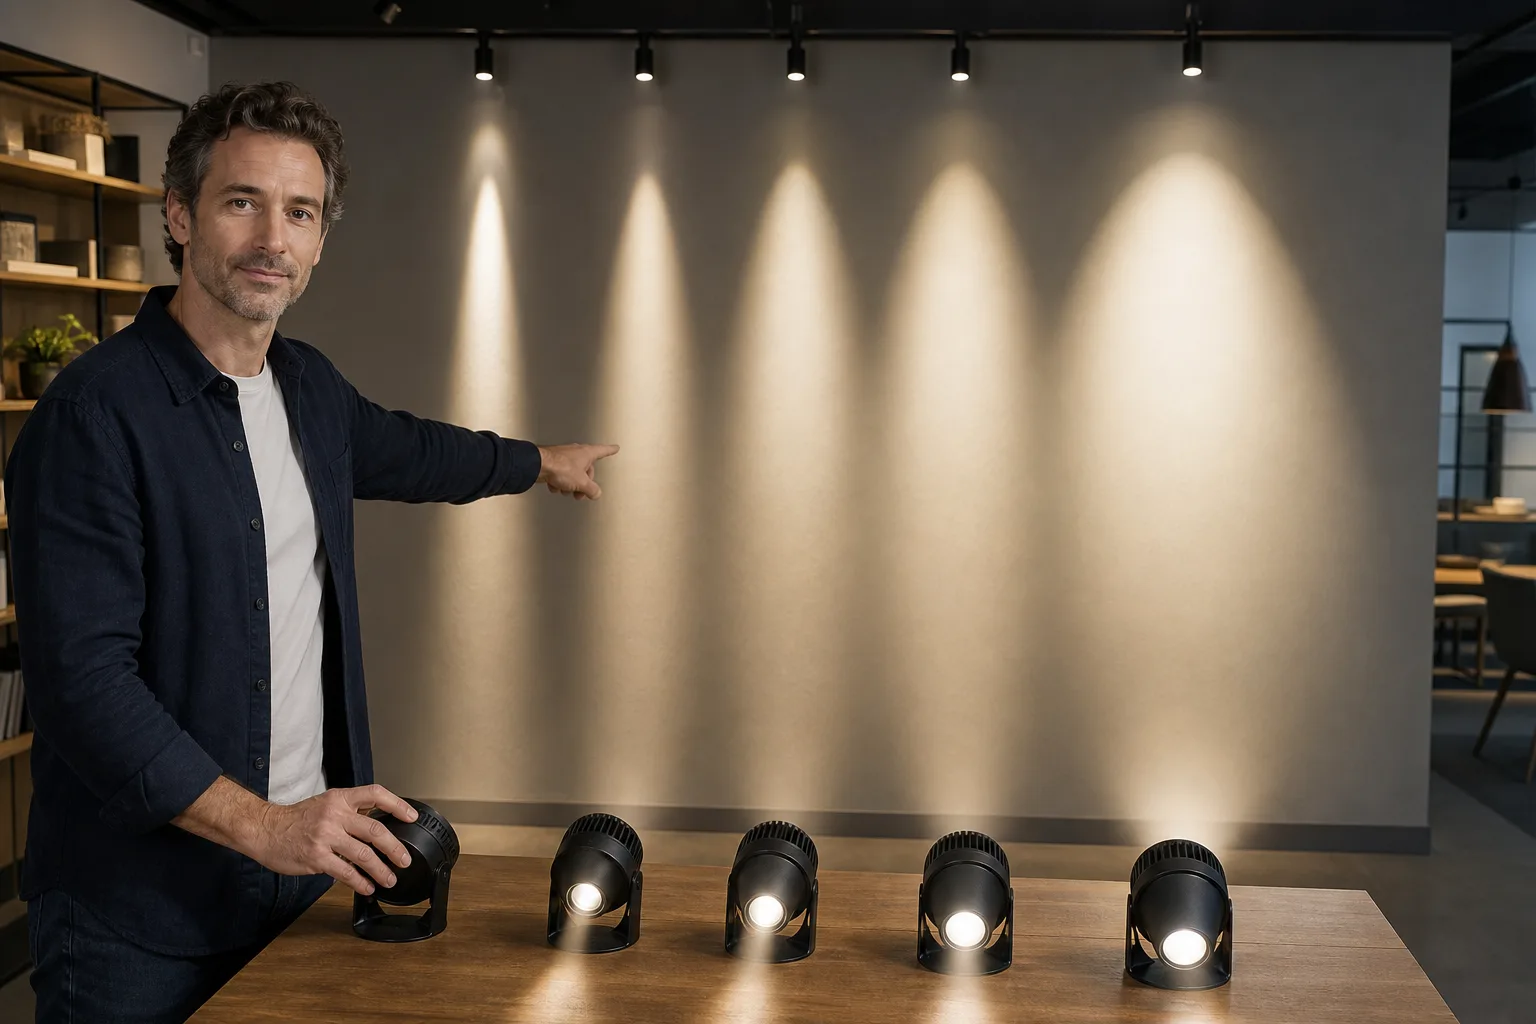
Lighting beam angle is the width of the cone of light produced by a directional lamp or fixture, measured in degrees. A narrow angle creates a concentrated pool of light, while a wide angle spreads light over a larger area. For most room-planning decisions, choose the angle by working backward from the area you want to cover, the distance from the light to that area and whether the fixture provides ambient, task or accent lighting.
What does beam angle mean?
The International Commission on Illumination defines beam angle using the directions where luminous intensity falls to 50% of the center-beam intensity. It is the full angle from one side of the beam to the other—not the angle from the centerline to one edge—and it is expressed in degrees. CIE International Lighting Vocabulary: beam angle
Think of the beam as a cone extending from a spotlight, downlight or reflector bulb. A 15° source forms a much tighter cone than a 60° source at the same distance. As the light moves farther from the illuminated surface, that cone covers a wider area.
Beam angle is not the same as brightness
Lumens describe total light output, while beam angle describes distribution. Two products can have the same lumen rating but place that light differently. The narrower product will often produce a stronger center emphasis because its output is concentrated, but beam shape, optics and center-beam intensity also matter. Do not compare directional products by lumens alone.
For a more complete comparison, check the manufacturer’s photometric data for:
- Beam angle: the width measured at the 50%-intensity points.
- Center-beam candlepower or center-beam intensity: intensity along the optical centerline, normally stated in candelas.
- Field angle: a wider boundary measured where intensity has fallen further. The Illuminating Engineering Society defines field angle at 10% of maximum intensity.
- Horizontal and vertical angles: separate values used for oval or asymmetrical distributions.
- Photometric plot: a diagram or data file showing how intensity changes away from the center.
Spot, flood and the angles between them
“Spot” and “flood” are convenient labels, but their ranges are not applied consistently by every manufacturer. The numeric beam angle is therefore more useful than the marketing name. U.S. Department of Energy guidance illustrates a progression from very narrow spot below 7° through spot and flood categories to very wide flood above 60°. U.S. Department of Energy: LED Lighting and Controls Guidance
| Approximate angle | General character | Useful starting applications | Planning caution |
|---|---|---|---|
| Under 15° | Very tight or narrow spot | Small objects, tall ceilings, dramatic accents | Precise aiming is critical; glare and hard edges can be noticeable. |
| 15°–30° | Spot to narrow flood | Artwork, shelves, architectural features and focused task areas | Check the calculated spread against the object’s dimensions. |
| 30°–45° | Flood | General accent lighting, counters and medium-size wall displays | Adjacent beams may need to overlap for even coverage. |
| 45°–60° | Wide flood | Broad task lighting and room illumination from downlights | A wide beam does not guarantee adequate light levels. |
| Over 60° | Very wide flood | Low ceilings, broad ambient layers and close-set surfaces | Light may reach walls or sightlines where it causes glare. |
These ranges are selection aids rather than universal product definitions. A nominal 40° beam from one fixture may not look identical to another because their field angles, intensity curves, lenses and optical cutoffs can differ.
How to calculate beam spread
For a symmetrical, circular beam aimed perpendicular to a flat surface, estimate the beam diameter with:
Beam diameter = 2 × distance × tan(beam angle ÷ 2)
Use the same unit for distance and diameter. If the distance is entered in feet, the result is in feet. The angle must be treated as degrees when using a beam-spread calculator. The formula describes the nominal 50%-intensity boundary; useful visible spill may continue beyond it.
Example: a 30° beam from eight feet away
Assume the distance from the light source to the illuminated surface is 8 feet:
Diameter = 2 × 8 × tan(30° ÷ 2) ≈ 4.3 feet
The nominal beam is therefore about 4.3 feet across. At four feet, the same beam would be approximately 2.1 feet across. Doubling the distance doubles the calculated diameter, although illuminance on the surface will also decrease as distance increases.
| Beam angle | Approximate diameter at 8 ft | Typical visual effect |
|---|---|---|
| 10° | 1.4 ft | Small, concentrated pool |
| 20° | 2.8 ft | Defined accent |
| 30° | 4.3 ft | Moderate accent or task spread |
| 40° | 5.8 ft | Broad flood |
| 60° | 9.2 ft | Wide area coverage |
| 90° | 16.0 ft | Very broad distribution |
Real installations may depart from this simple geometry. Tilted fixtures create an elongated patch, textured surfaces scatter light, furniture blocks part of the beam and asymmetric optics require separate horizontal and vertical calculations. Use the beam spread tool for quick estimates, then verify important projects with the product’s photometric report. For arrays of ceiling lights, a fixture-spacing tool or recessed-lighting calculator can help assess the room as a system.
Plan beam angles as part of layered lighting
A single beam angle rarely solves every requirement in a room. A more flexible plan combines ambient light for orientation, task light for activities and accent light for visual emphasis. Each layer can use a different distribution.
Ambient lighting
General illumination usually benefits from broad, overlapping distributions rather than isolated bright circles. Wide downlights can work, but spacing, ceiling height, lumen output, wall reflectance and room shape still determine whether the result feels even. Wall-washing or indirect light can soften contrast and brighten vertical surfaces.
Task lighting
Task light should cover the working area without placing hard shadows or glare in the user’s normal position. A kitchen counter may need a broad under-cabinet distribution, while a reading chair may use an adjustable medium beam. For islands and tables, consider both the cone size and the height of the pendant or spotlight. The kitchen-island pendant tool can help with fixture placement.
Accent lighting
Narrow and medium beams are useful for artwork, plants and architectural details because they create contrast with surrounding surfaces. Start with the target’s dimensions: the nominal spread should normally cover the intended feature without spilling far beyond it. Rectangular art may be served better by an oval distribution or multiple overlapping beams than by one circular spot.
- Living rooms: combine broad ambient light with adjustable accents and portable task lamps.
- Kitchens: prioritize shadow-controlled task coverage at counters, sinks and preparation areas.
- Bedrooms: use broad, lower-contrast ambient light plus focused bedside lighting.
- Hallways: check beam overlap and wall brightness to avoid alternating bright and dark patches.
- High ceilings: narrower optics may be needed to place useful intensity on the target, but calculations should include the full source-to-surface distance.
Explore the room lighting guides for layouts that account for more than beam angle alone.
Choosing bulbs, fixtures and controls
Match the lamp to the fixture
Reflector lamps such as PAR and some MR types commonly publish a beam angle. Ordinary omnidirectional bulbs may not, because the fixture shade or reflector shapes their final distribution. With integrated LED downlights, track heads and spotlights, the optical system is built into the fixture, so compare the complete fixture’s photometric data rather than the LED package alone.
When replacing a directional lamp, match the old beam angle if the existing coverage worked. Department of Energy guidance warns that a retrofit with a different distribution can create an uneven or unexpectedly narrow result. Also confirm the base, voltage, dimensions, maximum permitted wattage, enclosed-fixture suitability and wet- or damp-location rating as applicable. U.S. Department of Energy: distribution guidance
Understand what controls can change
A standard dimmer changes output, not the physical beam angle. Dimming can nevertheless make the beam appear less dominant by reducing contrast. Adjustable track heads change direction, while zoom optics or interchangeable lenses can alter spread. Smart scenes can balance lighting layers for different activities without requiring every fixture to produce the same distribution.
LEDs and dimmers are not automatically compatible. ENERGY STAR advises checking the downlight manufacturer’s compatible-dimmer list or the dimmer manufacturer’s recommendations. It also notes that recessed products touching insulation should be rated Type IC; non-IC products generally need clearance from insulation according to their instructions. ENERGY STAR: downlight buying guidance
Troubleshooting beam-angle problems safely
| Symptom | Likely planning issue | Possible response |
|---|---|---|
| Small, harsh hot spot | Beam is too narrow or fixture is too close | Try a wider angle, greater diffusion, lower output or an additional lighting layer. |
| Dark gaps between downlights | Beams do not overlap sufficiently | Review spacing, mounting height and photometric distribution. |
| Feature looks flat | Accent-to-background contrast is too low | Use a more focused accent, dim surrounding layers or adjust aiming. |
| Artwork is bright in the center only | Beam is too small or unsuitable in shape | Increase spread, move the light farther away or use oval/multiple beams. |
| Uncomfortable glare | Source or high-intensity beam is visible from normal sightlines | Re-aim an adjustable fixture or choose better shielding and optical cutoff. |
| New LED flickers when dimmed | Lamp, driver and control may be incompatible | Check approved compatibility lists; do not assume every dimmable LED suits every dimmer. |
Switch off power and allow a lamp to cool before replacing a user-serviceable bulb. Follow all fixture markings and manufacturer instructions. Stop if there is damaged wiring, scorching, persistent buzzing, moisture in an unsuitable fixture or uncertainty about the electrical supply.
Use a licensed electrician for new hardwired fixtures, replacement dimmers, circuit changes, recessed-housing alterations or any work involving unfamiliar wiring. LED retrofit kits must be suitable for the identified host luminaire and installed according to their markings and instructions; permit and approval requirements vary by jurisdiction. UL Solutions: LED retrofit luminaire conversion kits
Beam angle is ultimately one part of a coordinated specification. Begin with the target size and mounting distance, calculate the nominal spread, then review lumens, center intensity, glare control, color quality, controls and fixture compatibility. If you are building a lighting plan from the beginning, visit Start Here before selecting individual lamps or fixtures.
Frequently asked questions
What is the best beam angle for home lighting?
There is no single best angle. Broad beams of roughly 40° to 60° are common starting points for ambient or task coverage, while angles below about 30° are more suited to focused accents. Calculate the spread from the actual source-to-surface distance and confirm that it covers the intended area.
Does a narrower beam angle make a light brighter?
A narrower beam often concentrates more of a lamp's output near the center, but beam angle alone does not determine brightness. Compare lumens, center-beam intensity and the complete photometric distribution.
How wide is a 30-degree beam at eight feet?
For a symmetrical beam aimed straight at a flat surface, the nominal diameter is approximately 4.3 feet. This uses the formula 2 × 8 × tan(15°). Visible spill can extend beyond the calculated 50%-intensity boundary.
Can a dimmer change beam angle?
A standard dimmer changes light output rather than beam geometry. A fixture needs zoom optics, interchangeable lenses or another adjustable optical system to change its beam angle.
Should recessed lights have overlapping beams?
Some overlap is generally useful when recessed lights provide broad room illumination because it reduces dark gaps. The required spacing depends on ceiling height, beam distribution, lumen output, surface reflectance and the desired light level.
Questions & discussion
Share a question or a useful experience about this guide. Comments appear immediately. Your name and comment are public. Email is optional and stays private; reply emails are not enabled yet. Comment privacy.